Introduction
When it comes to gel imaging and blotting, conventional imaging devices have tended to offer either high-performance, complex functionality or low-cost, low-performance simplicity. That is, until now.
Bio-Rad has developed a one-button gel imaging system — the Gel Doc™ EZ system — that allows customers to image everything from gels to more complex applications automatically. This general-purpose, versatile instrument has a compact footprint, making it a space-saving, economically viable choice that does not compromise on performance. These streamlined features — both in size and operation — make the Gel Doc EZ imager ideal for the current laboratory environment in which efficient use of resources is critical.
The development of this system represents the culmination of years of progress toward simplifying the imaging step of gel electrophoresis workflows. As with all new product releases, launching the Gel Doc EZ system has required the vision and expertise of a cohesive internal team as well as testing and feedback from the scientific community. The key players involved in bringing the Gel Doc EZ system to market describe, in their own words, the critical steps — from conception to validation to product launch — involved in development of this latest imaging innovation.


Division Marketing Manager
Product Conception
Bio-Rad employees — regardless of department or role — are encouraged to recognize needs not being met in the life science research market and weigh in on ideas for new product development. In the case of the Gel Doc EZ imager, it was the inspiration of a team of Bio-Rad specialists to provide high functionality without complexity for gel electrophoresis imaging applications that led to the system’s development. Renee LeMaire-Adkins was among those on this original team.
Following a research career using a variety of imaging technologies — from the early days with microscopy and film to digital imaging to confocal and deconvolution systems — Renee started at Bio-Rad in Technical Support, specializing in imaging products. This position quickly led to one as a product manger for camera-based imaging devices, which eventually led to her being named division marketing manager for the entire imaging products line. Below, Renee describes the rationale behind the development of the Gel Doc EZ imager.
Many concepts — like the Gel Doc EZ imager — being worked on right now are a natural evolution of thinking that was going on 10 years ago when I started with the imaging group. A lot of researchers find it either intimidating to learn to use complex imaging and blotting systems, or frustrating to have to remember how to use them. The drive toward one-button operation was motivated by the realization that people purchase systems and don’t always continue to use them because they can’t remember how. If researchers can’t remember how to collect a good image or picture of their gel or blot, then they’ve lost their experiment — particularly when it comes to chemiluminescence. We know that in many labs, there is usually one “expert” who knows the ins and outs of how to use an imaging system, but once he or she moves on, others become frustrated because they are not able to operate the equipment. Over time, we began to realize that even basic gel documentation systems tend to be more complicated to use than they should be and then become underutilized.
One of the reasons that many gel imaging systems out there are painful to use is because they are based on operating a manual camera — meaning that the researcher must know how to set aperture, film speed, and exposure time. Think about the general population and the number of people who have never touched a manual camera and know how to operate only the automated cameras we have today. Much like mainstream camera counterparts, one-button image-capture operation for the life science community became a major priority in terms of product development.
As the imaging group was moving in the direction of one-button operation, a dialogue began with the electrophoresis group regarding difficulties associated with staining and destaining protein gels. We thought, “Wouldn’t it be great to not have to do this?” Working together with the electrophoresis team, we developed Criterion™ Stain Free gels and the Criterion Stain Free imaging system. The launch of the Criterion Stain Free system was quickly followed by the development and launch of the TGX™ long shelf life gels. The introduction of this line started additional dialogue around the possibilities of broadening the capabilities of the stain-free imaging device. So what we have done with the Gel Doc EZ system is take the simplicity that was pioneered with the Criterion Stain Free platform and apply it more broadly to general gel and blot imaging applications.

Senior Mechnanical Engineer
Hardware Development
Upon validation of an instrument product idea, it becomes the job of the hardware engineer to render the concepts tangible. Suresh Mehta’s mechanical engineering background gives him strength in precision mechanical design and optomechanics. During his tenure at Bio-Rad, Suresh has worked on Gel Doc imaging system enhancement projects, the ProteOn™ protein interaction array system, and his latest hardware engineering project, the Gel Doc EZ system. Suresh describes the process and challenges faced in the engineering step of Gel Doc EZ imager development.

The Gel Doc EZ imager offers the flexibility and functionality of complex imaging systems but in a much more compact, easy-to-use platform.
The way our team is structured, we all interact and collaborate from the conceptual stages of a new product to delivering the instrument to manufacturing. When developing specs for the product, we work closely with internal customer-facing personnel (marketing and systems integration groups) and solicit feedback externally from potential customers regarding their needs to determine what the product must be able to do. When the Gel Doc EZ system team was formed, I was assigned as the hardware member of the team.
From a functional perspective, the primary goal of the Gel Doc EZ project was to provide a version of our very successful Gel Doc system in a smaller, more user-friendly package. From a hardware engineering perspective, this project was based on the existing Criterion Stain Free platform, so we were able to start with an existing “envelope.” Not starting from the ground up was a big plus. The standard Gel Doc imaging system is designed for a platen that is 25 x 26 cm, so it accommodates very large gels. The Gel Doc EZ platen is much smaller at 15 x 11.25 cm. By reducing the size and the footprint of the instrument — while providing enhanced image capture and analysis capabilities — we’ve simplified the post-electrophoresis user experience.
This new instrument doesn’t require manual camera adjustments; it’s a single-button operation, so the customer doesn’t need familiarity with the instrument to take great looking images. The Gel Doc EZ system uses Image Lab™ software — a much improved and enhanced user-friendly software compared to what had been available before.
Because of the emphasis on simplicity for the researcher, we created four application-specific trays for the device. This was the most challenging part of the project from a design perspective — it took a little bit of, shall we say, inspiration and innovation to be able to do that. These trays interact with the instrument. The researcher simply places his or her gel on the tray and inserts it into the instrument. The instrument recognizes which tray it is and then performs the application specific to that tray type. Some examples of these applications include ethidium bromide (most common application for imaging instrumentation), SYBR® Safe (for nucleic acids with the advantage that it doesn’t destroy DNA structure by illumination at the time of imaging), stain-free gels, and Coomassie gels (gray-scale imaging).
In the design of the trays, we also accounted for the size of Bio-Rad gel products so we can image the gels in their own trays (on top of our trays) without researchers needing to transfer and potentially tear the gels.
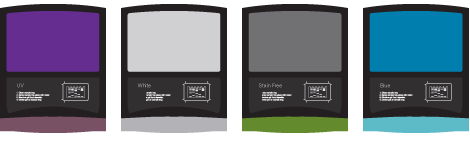
Gel Doc EZ imager’s application-specific trays. Choose from UV, blue light, stain-free, and white light application trays. The instrument senses which tray has been inserted and images the sample according to settings optimized for each application.

Senior Software Engineer
Software Development
No instrument can realize its potential without a software package that is optimally designed to operate system firmware. Keith Kotchou started his software development career with a company that creates CCD cameras, so even before he joined Bio-Rad’s imaging group 17 years ago he had acquired extensive knowledge about cameras and imaging. Keith remembers a time when electrophoresis gel imaging instruments were not camera based but instead were scanners that required the use of radioactive materials. Over time, the systems improved and evolved in capability, and throughout that time Keith worked to develop higher-level user software to operate each instrument introduced by Bio-Rad.
My involvement with the Gel Doc EZ imager project began with the Criterion Stain Free system in 2007. The idea for the Gel Doc EZ imager has been in the background for a while but moved to the forefront with the success of the Criterion Stain Free system. In all imaging system projects, I am involved a little bit with conceptual stages, then as firmware gets developed, I get together with the firmware designer to discuss software requirements and figure out various commands.
The biggest challenge with this particular project was presenting high-level software features to the user in a friendly, intuitive way. It can be tempting to include every bell and whistle in the user interface of a software program, but then you add complexity to the process, so the real challenge can be paring down and narrowing the focus of the program so that it’s simple to use but still includes both basic and complex functionality. Because the hardest part — from a software development point of view — is coming up with a simple-to-use interface, it’s important to recruit alpha and beta users (customers in the field). We watch what they do, take notes, have them do surveys, then adapt and change the software based on actual researcher usage.
A unique feature of this software compared to programs I’ve developed for other systems is that it is also translated into Mandarin. To do this, we had to go through the application and isolate the text strings that need to be translated from those that are internal to the program (things we can’t change or the program won’t work). This required wading through hundreds of strings — it can be a mind-numbing process. The translated strings are embedded in the software, so the regional settings on the customer’s computer will determine if the software displays in English or Mandarin. For customers, this process is seamless. They don’t have to do anything but run the software on their system to have it display in their desired language.

Software developed for the Gel Doc EZ imager displays in either English or Mandarin depending on the user’s regional computer settings.

Senior Staff Scientist
System Validation
Once hardware and software requirements have been defined and developed, early-version imaging systems must then pass the rigors of internal validation procedures. Kevin McDonald is the main systems validation person for all imaging-related hardware and software projects. A cell biologist by training, he started his career at Bio-Rad in Technical Support. Before the Gel Doc EZ project, he worked on the Gel Doc, ChemiDoc™, Pharos FX™, and GS-800™ systems, among many others. As he says, “I was a customer for many years as a scientist, then in Tech Support I got to come across problems vicariously through others. My job is to make sure that the software and hardware are doing what the application needs to do from the perspective of a scientist who is using the instrument. So I’m basically the voice of the customer in-house.”
Our imaging products aren’t pieces of hardware and software; they’re instruments designed to give information of value to scientists. So in testing these instruments, you need someone who understands what gels are, what scientists are trying to do with the gels, what information they’re looking for, and how they use gels in their normal fields of study.
With systems validation, you have a project plan and you test to that plan. Sometimes you can’t meet the specifications in that plan so you have to figure out why. Maybe the specifications were not defined appropriately to begin with; sometimes you have to go back and retest in case there was a bad sample. Other times there are software issues that pop up. When conducting validation testing we try to be as close to the customer experience as possible and always evaluate to make sure the customer obtains the best results possible. Sometimes we’ll have a situation where something technically matches the test plan requirements but I’ll see something that I think could improve the product, so we will go ahead and fix it even though the product technically passes validation check. You always keep your eye open for things that may affect the customer’s perception of the product or their ability to use it.
Some of the challenges we faced in the Gel Doc EZ project had to do with settling on an exact hardware setup. I’ll say to the engineers, “OK, we need to look at this particular application, which is going to require this excitation source and this emission filter.” So they implement that to the best of our estimates as to what is required. Then we have to run the applications and evaluate a number of things: appearance of the image, accuracy of the data, that sort of thing. Depending on a balance of how things work out for all the applications we evaluate, we have to change things. So we do. We’ve changed some filters on the excitation sources; we’ve changed emission filters to improve performance, both in image quality and in quantitative accuracy of the data.
The voice of the customer is something we pay very close attention to in the system validation process. In alpha and beta stages of development testing, we have a set of customers who are giving us feedback. We establish direct email lines of communication from these customers to the core product teams for hardware, software, systems integration, and marketing. The customers can email directly to the team any issues or questions, and we can respond very rapidly. Then we go back and rework software or hardware — whatever is needed to address problems. The ultimate challenge is the unlimited permutations that people have in terms of samples and how they are used in combination with our hardware and software. It’s impossible to test for the infinite possibilities customers might have. So then we just try to be as responsive as possible to any issues that might arise.

Staff Scientist,
Systems Integration
A Prelaunch User’s Persepctive
Before placing a newly developed imaging system in the hands of life science researchers, Bio-Rad continues to optimize performance based on feedback from customers. After finishing a post-doc at the University of California, Berkeley studying RNA-protein interactions, Nik Chmiel joined Bio-Rad as a systems integration scientist in gel electrophoresis and blotting. The nature of his work at Bio-Rad made him an ideal internal customer to test and provide feedback on the functionality of the Gel Doc EZ system prior to its release in the marketplace. Nik describes his experience using the imager in various gel electrophoresis experiments over a two-week period.
I was approached by the imaging team, who told me they had developed a new instrument (the Gel Doc EZ system) and asked if I would mind acting as an internal beta tester for the system. I agreed and was enthusiastic about the opportunity to “kick the tires” on the team’s newest concept. Installation was very straightforward: the imaging team brought the system over, plugged it in, connected it to the laptop, and within a few minutes I was up and running.
In the past, I would use the GS-800 calibrated densitometer in a typical gel imaging workflow or the Gel Doc system for white-light imaging applications like Coomassie-stained protein gels or for UV applications, such as visualizing ethidium bromide–stained DNA bands on agarose gels. I’ve also used other multi-use systems that contain either separate UV and white-light sources or can convert UV to white light using a special screen placed on top of the UV transilluminator. The common thread of all of these systems is that they require you to adjust several settings, like lens zoom, focus, and aperture, every time you change the size of your gel or the type of image you want to take. This process can be time consuming, especially the first couple of times you use the instrument. In addition, it can be frustrating to have to remember the particular settings you used for an image, especially if there are multiple users of the system, all with their own particular imaging setting requirements.
My overall experiences with the Gel Doc EZ system were very positive. I was able to figure the system out in just a few minutes of tinkering with the software and appreciated the fact that I could select an application and press a single button while the instrument did everything else — including data analysis with all useful parameters of results that I could export into practically any file format. There was no fussing with the lens focus or integration time; all the parameters I would have to adjust on other imagers were automatically optimized. Performance was also similar to other systems I’ve used, but the footprint was much smaller. This is great in a lab environment, where every square foot of space on a lab bench is precious. Its compact size also allows the Gel Doc EZ imager to be placed in an easily accessible location, such as the end of a bench, rather than in a separate room or off to the side somewhere, as is usually required with larger imagers.
The imaging team was very receptive to my feedback on their system. One change I requested was the ability to image Bio-Rad precast agarose gels in their trays. These trays contain features that allow for easy sample identification on the gels. In a previous Gel Doc EZ prototype, the gels worked just fine but the trays were a bit too tall to fit in the imager. The team incorporated my suggestion and the current prototype creates great agarose gel images — trays and all.
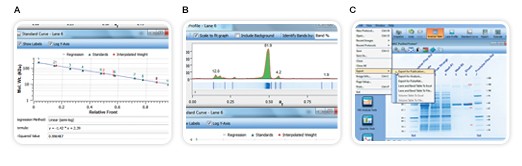
Image Lab software automatically detects lanes and bands, then performs analyses such as standard curves (A) and lane profiles (B), and compiles data tables of results. Reports generated can be exported to practically any file format (C).
Customer Feedback
Dr Sriram Kosuri is a post-doctoral candidate in the George Church Laboratory at Harvard University. Widely renowned for its ground-breaking work in gene synthesis, genetic sequencing, and in the Human Genome Project, the lab relies heavily on imaging technology to visualize and analyze DNA and RNA gels (primary applications) as well as screen colonies. Kosuri estimates that researchers in this lab run 5–10 gels per day, 98% of which are basic nucleic acid gels.
With several imagers at its disposal, including one by AlphaInnotech and a more sophisticated chemiluminescent imager, the lab recently acquired the Gel Doc EZ imager. Kosuri says, “The Gel Doc EZ imager has really been gaining traction in terms of usage in our lab. It’s a very nice machine that’s easy to use for basic agarose/PAGE gels.” So easy, in fact, that of the dozen or so researchers who have started using the imager — many of whom are new to the Church lab — none required training. “People appreciate not having to fuss with focus and aperture,” he says. And though it’s simple to operate, there is no need for the Church lab to sacrifice quality. “We just submitted an article for publication that includes many images obtained on the Gel Doc EZ imager,” says Kosuri.
Conclusions
The Gel Doc EZ imager is the culmination of years of work toward eliminating the complexity associated with the imaging step of the electrophoresis workflow. Much as the advent of point-and-click photography in the consumer market allowed practically anyone to create professional-quality photographs, the development of one-button imaging for a variety of electrophoresis applications is poised to eliminate operator inexperience and error as factors preventing capture of high quality, reproducible gel images.